Telnet is an application layer protocol, which allows data communication over the TCP/IP layer.
The following is a simple guide to help you enable your telnet from your Windows OS.
Check if Telnet is available
Before you start, check if the telnet program is already enable in your system.
- Launch command prompt.
Go to Start -> Run. Key in “cmd”, and press enter. - Execute the Telnet program.
Key in “telnet”, and press enter. - There is no Telnet program installed if the following error message appeared,
‘telnet’ is not recognized as an internal or external command,
operable program or batch file.

Proceed to the next section to install the telnet program. - If telnet program is installed, your should see the following message,
Welcome to Microsoft Telnet Client

Press “Ctrl+]” then type in “quit”, and press enter to exit the telnet program.
Install Telnet
Telnet program is available on the Windows OS. You just need to enable it. The following is the instruction to enable the telnet on your system.
- Go to Start -> Control Panel -> Programs and Features.
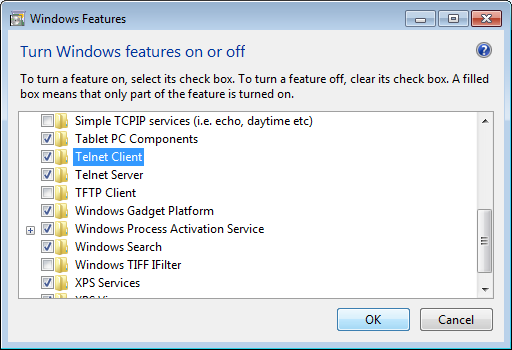
- Click on the left side bar menu, “Turn Windows features on or off“.
- Scroll down the program list and click to put a tick to “Telnet Client” and “Telnet Server” as shown.

You Telnet program is now installed.
